To be a valuable global supplier
for metallic honeycombs and turbine parts


Contact number
0555-2813555
To be a valuable global supplier
for metallic honeycombs and turbine parts
Technological Innovation
Process Management
Continuous Improvement
Customer Satisfaction
Knowledge
Dedication
Diligence
Loyalty
Responsibility
Confidence
Tenacity
Respect

To be a valuable global supplier
for metallic honeycombs and turbine parts
Release time:2026-07-18
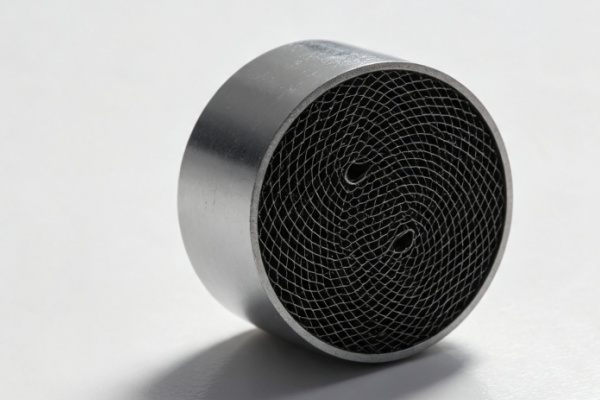
Most people see a finished metal substrate and think it's just a piece of honeycomb. Cut it, stack it, done. They don't see what goes into making one that actually holds together in a hot exhaust for years.
A round metal substrate core isn't stamped. It's not cast. It's built layer by layer, then fused together in a vacuum furnace. The whole process – from foil to finished part – takes hours. And every step has to be right.
Here's how we do it.
Step One – The Foil
It starts with rolls of thin metal foil. Stainless steel, mostly. 0.05 mm thick for most automotive applications, sometimes 0.08 or 0.1 mm for heavy-duty diesel.
Every coil gets checked before it hits the line. Thickness at three spots. Surface for oil, scratches, or oxidation. If the foil is dirty, the braze won't stick. If it's too thin or too thick, the cells come out wrong.
We also run a test braze on a small sample from every coil. If the braze doesn't take, the whole coil goes back.
One time a supplier changed their rolling process without telling us. The foil looked fine. The brazing failed on three batches. Now we test everything like we don't trust anybody.
Step Two – Corrugating
The flat foil goes through a set of forming rolls. The rolls press the foil into a wavy shape – corrugations. Like a miniature version of a cardboard box liner.
The roll geometry determines the cell size. 400 cells per square inch is standard for automotive. 300 for diesel. 600 for high-performance or tight emissions.
The rolls wear over time. We change them on a schedule, not when they break. Every hour we check cell dimensions with a gauge. If the gauge doesn't fit right, we stop and swap the rolls.
If the corrugations are uneven, the cells come out crooked. Crooked cells mean bad flow distribution. Bad flow means hotspots and poor conversion.
Step Three – Winding (The "Full Circle")
This is where the round shape comes together.
We take two strips – one corrugated, one flat – and wind them together around a mandrel. Like rolling up a sleeping bag. The corrugated strip creates the cell walls. The flat strip closes them off.
The winding has to be tight. If it's too loose, the layers shift and the cells don't line up. If it's too tight, the foil stretches and the cells deform. There's a sweet spot – and it takes practice to find it.
We stop winding when the diameter hits the target. The operator measures it with a caliper. Stop too early, the substrate is undersized. Stop too late, it won't fit in the can.
Between each layer, we apply brazing filler. For some processes it's a paste. For others, it's a thin foil or powder [1†L8-L10]. The filler is what melts in the furnace and bonds the layers together.
Step Four – Stacking and Fixturing
Once the core is wound, it needs to hold its shape during brazing. Without fixturing, the layers can shift or warp under heat.
We put the wound core into a fixture – a metal sleeve that holds it tight. The fixture applies light compression to keep the layers from separating during the braze cycle.
For larger substrates, we use heavier fixtures. For smaller ones, lighter. The compression has to be just right. Too much, and the foil buckles. Too little, and gaps form between the layers.
Each stack gets an ID tag. Foil coil number, operator, date. Traceability matters. If something fails, we need to know exactly where it came from.
Step Five – The Vacuum Furnace
This is where the magic happens.
The fixtured core goes into a vacuum furnace. We pull the air out – down to 10⁻⁵ torr or better [2†L19-L20]. No oxygen. Oxygen would oxidize the metal and ruin the braze.
In the vacuum, we heat the core. Slowly. Ramp up at 5-10°C per minute [3†L12-L13]. Too fast, and the metal expands unevenly. Thin foil warps. Layers shift.
The temperature depends on the material. For stainless steel with BNi-2 brazing alloy, the brazing temperature is 1020-1050°C [3†L12-L13]. Hold it there for 5 to 20 minutes [3†L13]. The filler melts, flows into every gap between the layers by capillary action [2†L5-L6], and wets the surfaces.
For aluminum, the temperature is lower – around 580-595°C [3†L31]. Different furnace, different cycle.
We monitor the temperature with thermocouples inside the furnace – not just on the controller. If the temperature drifts, the braze won't flow properly. Too cold, weak joints. Too hot, the filler runs out of the joints or the foil warps [2†L12-L13].
Step Six – Cooling
After the soak, we cool it down. Slowly. 5°C per minute down to about 500°C for stainless, then faster after that.
Too fast, and the metal shrinks unevenly. Cracks form at the joints. The first 200°C of cooling is the most critical. Rush it, and you scrap the batch.
We learned that the hard way. Tried to speed up cooling once to save time. Scrapped half the batch.
The whole cycle – ramp, soak, cool – takes 6-8 hours. You can't rush it.
Step Seven – Inspection
The core comes out of the furnace. Now we check if it's any good.
Peel test. We sacrifice one core from every batch. Clamp one layer in a vise, pull. The foil should tear before the braze lets go. If the braze separates clean, the whole batch is suspect [5†L16].
Tap test. Tap the core with a screwdriver. A solid braze rings – clean metallic sound. A dull thud means the layers aren't bonded.
Light test. Shine a bright light through the core. Even pattern means straight cells. Dark spots mean crushed or crooked cells.
Dimensions. Measure the diameter and length. Out of spec? Doesn't ship.
Cut and inspect. For critical batches, we cut a section open and look at the braze under a microscope. No voids, no gaps, no incomplete flow.
What Can Go Wrong
Foil with oil. Brazing fails. Caught by incoming test braze.
Worn forming rolls. Uneven cells. Caught by hourly cell checks.
Loose winding. Crooked cells. Caught by light test.
Furnace temperature drift. Weak or missing braze. Caught by peel test.
Cooling too fast. Cracks. Caught by tap test and cut inspection.
We keep a log of every failure and what caused it. That's how we get better.
Why Vacuum Brazing Beats Gluing
You can glue honeycomb together. Some manufacturers do. Cheaper. Faster.
It doesn't last.
Glue degrades under heat. Gets brittle in the cold. Absorbs moisture. Over time, the bond weakens. Shielding drops.
Vacuum brazing is permanent. The metal itself fuses together. No glue to fail. No moisture to absorb. No thermal cycling to fatigue.
Vacuum brazed cores hold 90-110 dB of attenuation. Glued cores give 60-85 dB at best. That's the difference between a substrate that lasts and one that doesn't.
Bottom Line
A round metal substrate core doesn't happen by accident.
Good foil. Sharp corrugating rolls. Tight winding. Proper fixturing. Controlled vacuum furnace cycle. Slow cooling. Thorough testing.
Get any of these wrong, and the core fails. Maybe not today. Maybe not tomorrow. But eventually.
We run this process every day. We've made the mistakes. We've fixed them. Now we know what works.
If you need round metal substrate cores that hold together, that's what we do.